Showing posts with label Recipe. Show all posts

Sunday, April 6, 2014

Avenger Me!

Our friends David and Amanda are hosting an Avengers party today in honor of the new Captain America movie coming out. The day consists of an Avengers movie marathon then a viewing of the new movie this evening.

They asked that we bring "superhero" themed snacks - Challenge accepted!

I started checking out Pinterest but every snack idea that came up in searches were for DC superheroes and NO AVENGERS! WHAT? So I came up with my own ideas

Here what I came up with!


Hulk Jello Cups


Hulk Jello Cups

I drew the Hulk on each cup and filled them with green Jello!

Hulk Jello Cups

Thor's Meat and Cheese Hammer

I cut up Summer Sausage and Mozz Cheese and stuck a pretzel in them!


Captain America's Cupcake Shield

I made mini cupcakes and topped each one with colored icing red-white-red-blue. Captain America would be proud!

So take some inspiration - pass it on - and throw your own Avengers party!

Friday, March 21, 2014

For the Love of Muffins!!

Those who have been in my home for events know that I LOVE muffins!! Often I'll get inspired and bake up a whole batch of blueberry or banana or lemon muffins. The downfall is my husband doesn't eat many of them so they all end up in my tummy!

Unfortunately for this vice of mine, it doesn't fit too well in my new baby diet. So I have been on the hunt for tasty, low calorie muffins to test out and enjoy.

Wednesday for our Small Group Bible study, I decided I would use them all as guinea pigs for a new, light muffin recipe I found from Cooking Light magazine. I thought I'd share with you all.


Nutritional Information
Amount per serving (serving size: 1 muffin)
  • Calories: 182
  • Calories from fat: 28%     
  • Protein: 2.9g
  • Carbohydrate: 30.4g
  • Fiber: 0.6g
  • Cholesterol: 14mg
  • Sodium: 176mg       


Sour Cream Coffeecake Muffins

Ingredients:
1/2 cup packed dark brown sugar
1/4 cup chopped pecans (I declined on the pecans)
1 1/2 teaspoons ground cinnamon
1 cup granulated sugar
1/4 cup butter, softened
1/2 cup egg substitute (I used egg whites)
1 cup reduced-fat sour cream
2 tablespoons water
1 teaspoon vanilla extract
1 3/4 cups all-purpose flour (about 7 3/4 ounces)
1 teaspoon baking powder
1/2 teaspoon baking soda
1/2 teaspoon salt
 
Topping:
6 tablespoons powdered sugar
3 teaspoons fresh orange juice
Dash of salt
 
Preheat oven to 400°.
Combine first 3 ingredients; set aside (dark brown sugar, pecans, cinnamon).

Place granulated sugar and butter in a large bowl; beat with a mixer at medium speed until well blended (about 3 minutes). Add egg substitute; beat 3 minutes. Beat in sour cream, water, and vanilla.
Lightly spoon flour into dry measuring cups; level with a knife. Combine flour, baking powder, baking soda, and salt in a large bowl, stirring well with a whisk. Make a well in center of mixture; add sour cream mixture. Stir just until combined.

Place 3 tablespoons brown sugar mixture in a small bowl; set aside. Sprinkle surface of batter with remaining brown sugar mixture. Gently fold batter 4 times.

Place 18 paper muffin cup liners in muffin cups; coat liners with cooking spray. Spoon batter into prepared cups. Sprinkle batter evenly with reserved brown sugar mixture. Bake at 400° for 25 minutes or until a wooden pick inserted in center comes out clean. Remove muffins from pan immediately; place on a wire rack. Cool 10 minutes.

Combine powdered sugar, juice, and dash of salt in a small bowl, stirring until smooth. Drizzle powdered sugar mixture evenly over muffins.

Wednesday, March 19, 2014

Pork Chops with Balsamic-Strawberry Sauce and Baked Green Beans withBacon

This meal is being added to my Starred / Favorites list!
Low Calorie and Gluten Free!

referenced from eMeals


Main Dish
2 (4oz) center-cute loin pork chops
1/8 tsp Salt
1/8 tsp Pepper
1 tsp chopped, fresh Rosemary
1 clove Garlic, minced
1 tsp Olive Oil
1 cup sliced, fresh strawberries
2 Tbs Balsamic Vinegar
1 Tbs honey

Instructions:
  1. Sprinkle Pork with Salt and Pepper; rub with Rosemary and Garlic.
  2. Heat oil in large non-stick skillet over medium-high heat.
  3. Add Pork Chops.
  4. Cook 2-3 minutes on each side or until done; remove from skillet and keep warm.
  5. Add Strawberries, Vinegar, and Honey to skillet; cook 6-8 minutes, stirring occasionally, until sauce is slightly thickened.
  6. Place pork chop on each of 2 plates; top evenly with Strawberry mixture.
 
Side Dish
1/2 lbs fresh Green Beans, trimmed
2 slices center-cut Bacon, chopped
2 cloves Garlic, thinly sliced
1/8 tsp Salt
1/8 tsp Pepper

Instructions:
  1. Preheat oven to 400 degrees.
  2. Toss Green Beans, Bacon, Garlic, Salt, and Pepper in a jelly-roll pan coated with cooking spray.
  3. Bake 12-15 minutes or until crisp-tender
  4. Divide Beans into 2 equal portions; serve alongside Pork Chop

Calories per server: 396
Makes 2 Servings

Wednesday, March 12, 2014

Easy Skillet Chicken Parm

My poor husband. He loves fish - but never gets to eat it because I don't know how to make it nor do I like eating it. We usually resolve this dilemma by, on occasion, eating out and he will order some sort of seafood dish. However from time to time he asks me to make one of his childhood memory dishes that contain some odd-to-me smelling fish.

This time he wanted his mom's, family-famous Cream Tuna on Toast - YUCK!
 
So that leaves me in the lurch when this happens, having to prepare two meals at once. With a refrigerator that is nearly empty I wasn't sure what to swing together for myself so I decided to improvise!
 
I came up with an easy recipe for Skillet Chicken Parm.


What You'll Need
1 tablespoon olive oil
6 skinless, boneless chicken breast halves (about 1 1/2 pounds)
1 1/2 cups  Traditional Italian Sauce (I like Classico)
1/4 cup grated Parmesan cheese
1 1/2 cups shredded mozzarella cheese (about 6 ounces) 


How to Make It
Heat the oil in a 12-inch skillet over medium-high heat.  Add the chicken and cook for 10 minutes or until well browned on both sides.
 
Stir the sauce and 3 tablespoons Parmesan cheese in the skillet.  Reduce the heat to low.  Cover and cook for 10 minutes or until the chicken is cooked through.  Sprinkle with the mozzarella and remaining Parmesan cheese.  Let stand for 5 minutes or until the cheese is melted.  

Obviously I didn't make 6 chicken breasts for myself. I reduced everything down for 1 chicken. You can put the entire pan in the oven after sprinkling the chesses on it to crust the cheese, but I found it melted was sufficient for me.

The entire meal took me 25 minutes to prepare and cook, so I starred the recipe card in my box and will use it again!


Saturday, February 22, 2014

The Failure in Me

I pride myself on always being able to prepare the most delicious, scrumptious desserts around! Whenever we have company to our home I am an extra special effort to have something sweet available for their delight. I've been complimented countless times for my Frozen Berry Delight or my Heaven in a Cup.

Well the time for my humbling has arrived.

I spent the most of my afternoon running around doing errands then came home to bake a simple, delicious pie. I thought instead of the traditional apple pie with a top crust, I would attempt a dutch apple pie with crumble on top... 

I should have known better than to try something new. 

I follow the recipe posted from The Art of Natural Living. As you can see the pie is supposed to look something like this: 


I made it through the pie faze, the apples were juicy and perfect and the crust was pre-made so I didn't have to spend hours fighting with it. When I got to the crumble part on top I read the recipe as follows on her site: (someone please correct me if I'm wrong.)

Streusel Topping
  • 1 c flour
  • 1/2 c brown sugar
  • 1/2 c butter
Directions 
  • Mix streusel ingredients (I used my fingers) lightly until they come together in crumbly pea-sized pieces.  Top the apples with the streusel topping.
I set my oven to the correct temp and let it preheat all the way. I then placed my pie on the rack in the middle of the oven to bake. A little later I came back to check on it, making sure no juices were getting over the pan, and low and behold this is what I found...


 Yuck... Please note this picture was taken AFTER the topping was placed on the apples and baked for 30 minutes. Everything... melted and dropped into the apples... 

My only conclusion is that this lady's recipe is flawed... I mean how wrong can you go with three ingredients? So I'm out a bag of apples, lots of sugar, and a little bit of my pride... 

Will I EVER be able to make a pie successfully?


Monday, February 17, 2014

Carrot Zucchini Bread

I remember growing up we had a small garden in our backyard. It was always the family joke because dad built it over the sewage so the grass was always greener in that spot. As kids, we learned to plant, weed, water, and harvest our family garden, and the results were so delicious!

One year mom and dad planted some Zucchini and soon we had great, big, ripe squash to make use of. I'm not sure if this was the first sighting of Zucchini bread in my life or if it was a regular around the house, but with the coming of our child I've been feeling nostalgic lately.

I found this recipe online for a beloved childhood favorite. Looking back now, I should have found a recipe with less sugar in it, so I am currently on the hunt for one made with applesauce instead.

This bread cooked wonderfully - it was easy to prepare and so delicious! I baked it into one loaf and the rest into 12 muffins for at work.

Carrot Zucchini Bread
 
Carrot Zucchini Bread
Adapted from Pies and Plots
Ingredients
1 cup vegetable oil
2 cups granulated sugar (you see now why I want a different recipe?)
3 large eggs
1 tablespoon pure vanilla extract
3 ¼ cups all-purpose flour
½ teaspoon kosher salt
2 ½ teaspoons baking powder
¾ teaspoon baking soda
1 tablespoon ground cinnamon
1 teaspoon ground cloves
2 cups grated carrots
2 cups grated zucchini
1 cup walnuts (I did not use walnuts - not my favorite)

Instructions
Preheat oven to 350 degrees. Oil and flour 2 loaf pans. (I used 1 loaf and 1 muffin pan)
 
In a large bowl, whisk together oil, sugar, eggs, and vanilla until fully combined.
Stir in flour, salt, baking powder, baking soda, cinnamon, and cloves, but do not over mix. Add in the grated carrots and zucchini and walnuts. Stir until evenly distributed.
 
Divide batter evenly among the loaf pans. Bake for 1 hour to 1 hour 10 minutes, rotating halfway through if necessary, until a toothpick inserted in the center of the loaves comes out with only a few moist crumbs. (For muffins bake at same temp for 20-23 minutes.)
 
I packaged up my muffins, two by two, and tossed them in the freezer where they will be good for up to 4 months. This way I can pull two our to add to my lunch/snack for work!

I'll be back in another post soon with a recipe that is a little more "healthy" friendly as I still have some fresh zucchini to use up!

Tuesday, February 11, 2014

Saw It - Made It - Ate It

Last week a friend of mine shared a recipe with my via Facebook. I'm always looking for new and inventive ideas for dinner to keep myself occupied in the kitchen, so I was excited to find this recipe easy-peasy.

I never knew Sweet and Sour Chicken would be possible in my kitchen, I've never really attempted anything "ethnic." I changed a few things to make it more conducive to the ingredients in my kitchen, and I think it turned out wonderfully!

Sweet and Sour Chicken
adapted from: Made it, ate it, loved it


Chicken Breading:
3-5 chicken breast
salt and pepper
1 cup cornstarch (more as needed)
 3 eggs, beaten
1/3 cup canola oil
Rinse chicken, trim off fat or extras and then cut into 1 inch cubes. season with salt and pepper. Coat chicken in the cornstarch and then into eggs. Heat oil in large skillet. Cook chicken until browned. Place in 9/13 baking dish.

Sauce:
3/4 cups light brown sugar (changed from White sugar)
4 Tablespoons ketchup
1/2 cup white distilled vinegar
1 Tablespoon soy sauce
1 teaspoon garlic salt
Whisk until smooth. Then pour evenly over chicken. Turn chicken so the sauce gets on both sides and then put in the oven at 350 degrees for 15 minutes. turn chicken and then cook for 15 more minutes.

Here were my concerns -
1. I thought the egg would defeat the cornstarch and wipe it all off, It didn't!
2. I assumed the sauce would make the crispy chicken soggy, it only glazed and was delicious.
3. I changed the recipe to use BROWN SUGAR to make the sauce thicker, and used light for my figure.

I cooked up some white rice and mixed veggies for a delicious blend and served to our guests. I am very happy with the results and added a "*" to my recipe card for future use!

Friday, November 15, 2013

Grab Green Disposal Pods

One of my favorite features of our home is the Garbage Disposal system in our Kitchen Sink. I never thought I would ever use one in my life - so I feel slightly spoiled.

However - Sometimes I'll wake up in the morning to a horrid stench coming from the kitchen... 

The Culprit? 

Mr. Garbage Disposal, in the Kitchen, with the Sink!

I began my search for a green solution to defeating the horrid monster stench that I could make myself. I came across the idea of using Ice Cubes filled with a mixture of Vinegar and Lemon Peels that has brought the stench to it's knees. 

One simple drop of an ice cube (stored in a sealed, freezer-safe container), a little hot water, and a lot of loud grinding and the job is done!


Ingredients: 
The peels from 2-3 lemons
1.5 cups of Distilled Vinegar

Directions: 
Chop Peels into small slices and add 1-2 to each cube tray
Pour vinegar evenly into every cube tray
Place tray in freeze and let freeze
Remove cubes into a gallon sized freezer bag for storage. 

And it's that simple! I only use one cube each time so they last me forever. Hope you enjoy this green solution for your disposal monster. 


Tuesday, September 17, 2013

Fajitas for a Crowd

Sometimes my home feels like a revolving door.

Don't get me wrong, I love it!

However, often times we are feeding several people on a budget! Chicken seems to always be the way to go and it's so easy! I wanted to share my favorite Chicken Fajita recipe for all to try.

What I love about this recipe is you can easily change the quantity you are making to accomdate the crowd in the home. And as a bonus, you'll get everyone's tummy's rumbling as they smell the goodness slowly cooking throughout the house!

Crock Pot Chicken Fajitas

  • 1 yellow onion, sliced
  • 3 sweet peppers, sliced
  • 1 ½ pounds boneless chicken breast or thighs
  • 1/4 to ½ cup chicken broth, depending on preference (leave this out if you prefer a drier fajita filling)
  • ½ teaspoon salt
  • 2 tablespoons cumin
  • 1 ½ tablespoons chili powder
  • Tortillas
  • Fajita fixings
  1. Combine sliced onion and peppers in the bottom of a greased crockpot.
  2. Lay chicken on top of veggies.
  3. Pour chicken broth over top.
  4. Sprinkle everything with cumin, salt, and chili powder.
  5. Cover and cook on low for 4-8 hours (or on High for 4 hours) or until meat is shreddable.
  6. When meat is done, shred with two forks and stir back into juices. Serve meat mixture with slotted spoon on tortillas with your choice of fixing
Note that you can forgo the Salt, Cumin and Chili Powder for a pre-made Fajita Seasoning pack. 


Monday, March 18, 2013

Joey's Revamped Roast

My dear friend Joey gave us the great recipe idea for a roast to try. I adapted it for to work in my crock pot but then I loved the flavors so much I started using it for all sorts of things!

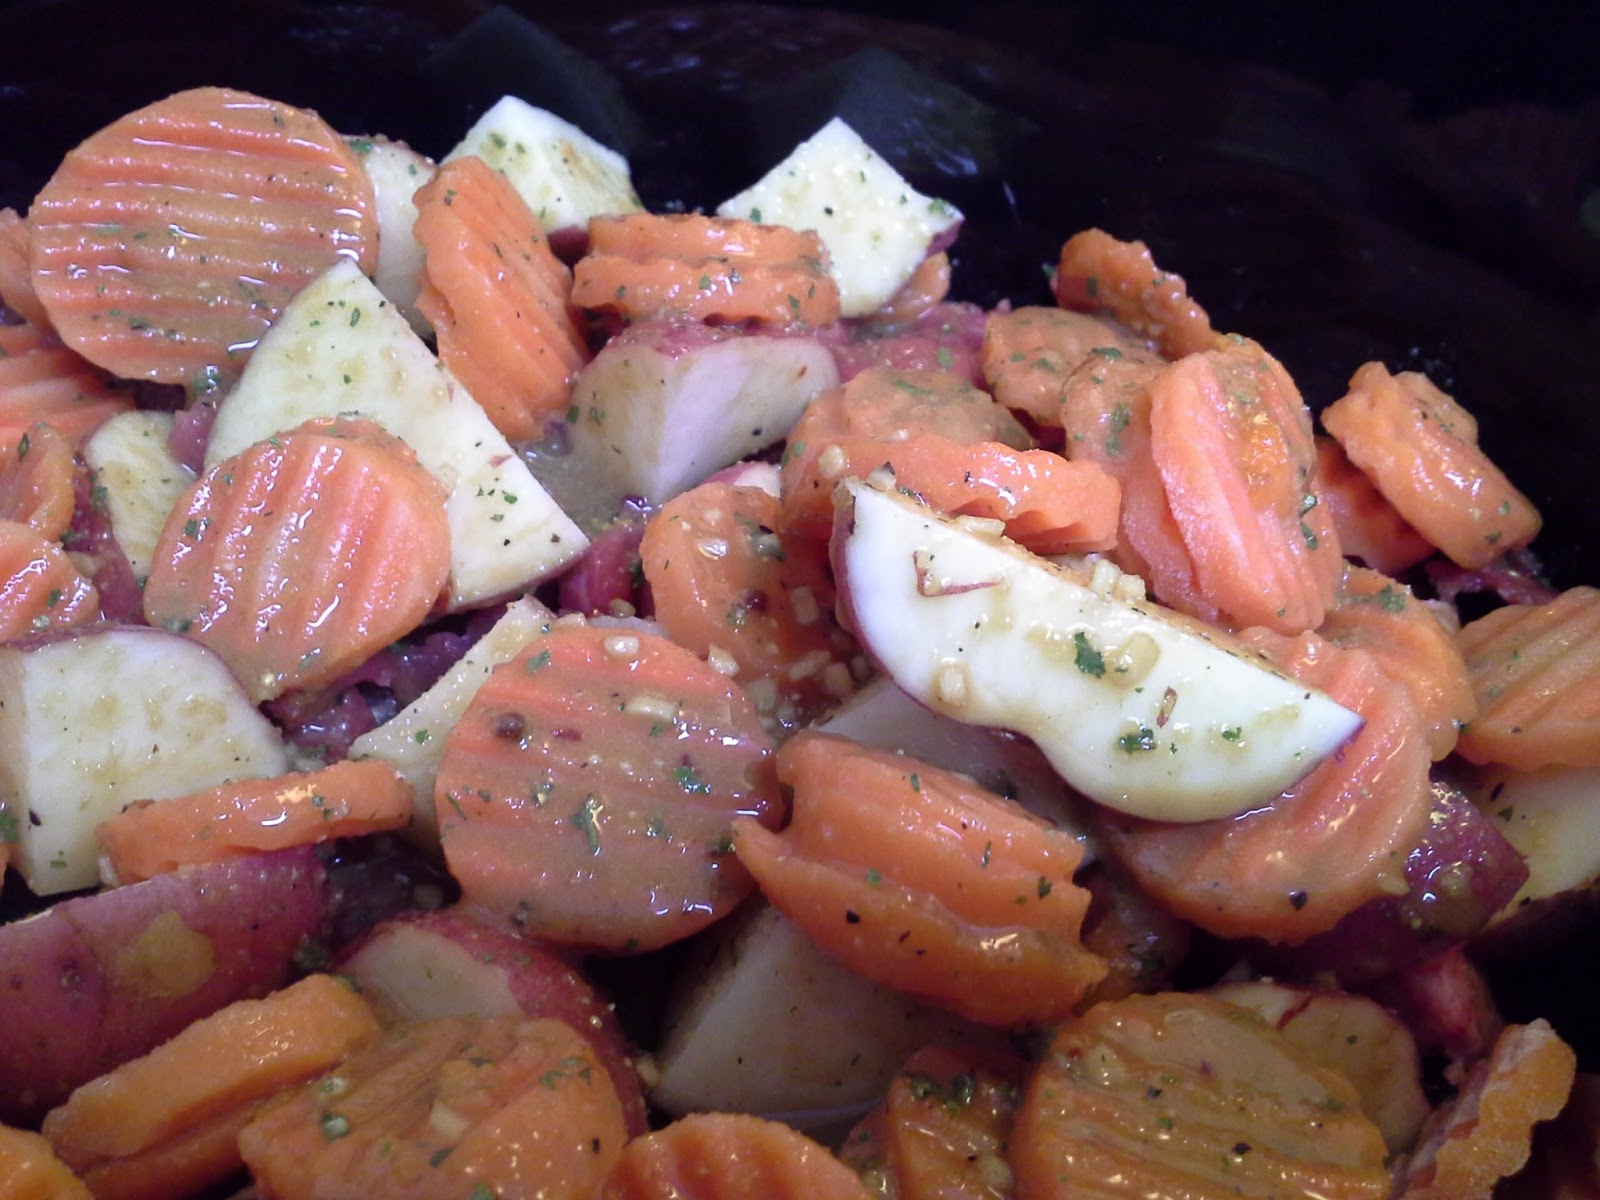
Here is the Stew "stewing" at home while I work hard at the office


Joey's Revamped Roast

Meat - any kind of meat you like. I use steaks, stew meat, shoulder roast... take your pick!
3-4 Red Roasted Potatoes, Cubed
1c Carrots, sliced (I use frozen for practicality reasons)
1 pkg Ranch Dressing Mix
1 pkg Italian Dressing Mix
1 pkg Brown Gravy Mix
1 Cup cold water

Place the meat on the bottom of the crock pot


Layer the Carrots and Potatoes on top


Mix the Ranch, Italian, and Brown Gravy Packages together in the Cup of water and pour all over 


Let the entire thing cook on low for 8 hours and your house will not only smell magnificent when you come home, but dinner will be ready to roll. 

Thanks Joey for this fantastic recipe, it is a staple in our home. 


Tuesday, March 12, 2013

Frozen Berry Delight

Whenever we have company, I guess I try to out-do myself each time. It's not normal for me to try something new on a night when company comes over but in this case I was so excited about this recipe that I couldn't help myself!

Last night my grandparents were scheduled to stay the night while traveling between southern Florida and Texas. We were fortunate enough to have my dad fly in the same night! We decided that since dad had a couple of hours to kill we would all get together for dessert. 

Wanting to out-do any restaurant in the area, I set out to find the most lavish-looking dessert I could possibly make under 10$ - and I found it. I like to call it:

Frozen Berry Delight


INGREDIENTS:
 1 pouch (1 lb 1.5 oz) Betty Crocker double chocolate chip cookie mix
1/4 cup vegetable oil
2 tablespoons water
1 egg
1 1/2 cups fresh raspberries (I just used frozen berries)
4 containers (4 oz each) Yoplait Whips! Raspberry mist yogurt (you can use whatever flavor you like, I used Strawberry)
1 cup whipping cream, whipped (Heavy Whipping Cream balanced out the sweetness of the crust)
2 tablespoons hot fudge topping
1 cup fresh blueberries (Again, I used frozen)

 Mix together cookie mix, oil, water, and egg; drop 6 1Tbls cookies onto a greased tray. Press remaining dough in the bottom and 1 inch up sides of spring-form pan. Bake at 350°F for 11-13 minutes.

 In medium bowl, fold 1/2 cup raspberries into yogurt; spread evenly over crust. Crumble cookies; sprinkle over yogurt mixture. Carefully spread whipped cream evenly over cookie crumbs. Freeze 4 to 5 hours or until firm. Remove sides of pan.


 Drizzle 1 tablespoon fudge topping over dessert. Top with blueberries and remaining raspberries. Drizzle with remaining fudge topping. Store in freezer.
I served this frozen to our guests and everyone loved it! A sweet cookie crust, a mousy-yogurt center, topped with a creamy whipped topping... I could just drool!  So next time you need to fancy up your dessert for a guest, this is a top runner to choose from!


Thursday, March 7, 2013

Heaven in a Cup

Welcome to today's test

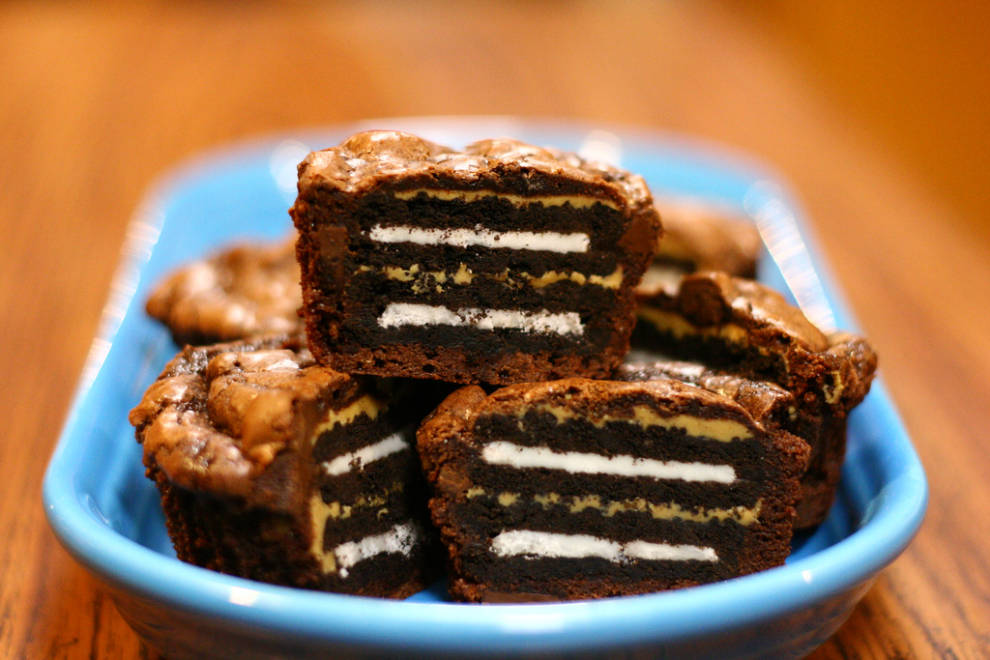
Today I made these brownies for the first time and they "melt in your mouth!" I wanted to share my own pictures but the one from this site is so much more delicious-looking. 

If you're ever looking for a way to dress up ever-day brownies, this is a great way
to make them a little more fancy for any occasion. 

The Worlds Best Oreo & Peanut Butter Brownies!

INGREDIENTS

1/2 cup butter
1 cup granulated sugar
2 eggs, beaten
1 tsp vanilla extract
1/3 cup unsweetened cocoa powder
1/2 cup flour
1/4 tsp salt
1/4 tsp baking powder
Cookie topping:
32 Oreo cookies
3/4 cup peanut butter, creamy or nutty

Directions
Preheat your oven to 350°F (180°C). Line the muffin cup baking pans with 16 paper liners.
Melt the butter in a large saucepan.
Remove the pan from the stove.
Stir in the sugar, eggs and vanilla with a large wooden spoon.
Add the cocoa, flour, salt and baking powder, beating well after each addition.
Assemble the Oreo cakes and bake.
Spread 1 teaspoon of peanut butter on one Oreo cookie.
Place another Oreo cookie on top of the peanut butter.
Put the double-stacked cookie into a muffin cup.
Prepare the other cookies in the same way.
Spoon about 2 tablespoons of the brownie batter over each stacked Oreo. Allow the batter to run down the sides of the stacked cookies.
Bake the cakes for 18 to 20 minutes until the brownie mix is cooked through.
Let the cookies cool completely before serving.

Recipe originally from here

Thursday, February 28, 2013

What's Cooking Good Looking

How do you feel about your Crock Pot?

I LOVE MINE

 Somewhere along the way we were given this great little cook book called

THE COMPLETE SLOW COOKER COOKBOOK


And it truly is complete

If you're a working wife/mother, this book is essential to your kitchen-success! There are many sections to this book from easy appetizers to more fancy meals for company. I like the "Every Day" section. I have so many recipes I have yet to try, but you can never go wrong with chicken.

I was more than elated when I found out I could cook a whole chicken in the Crock Pot!

So today, I'm making Lemon Roasted Chicken in the Crock Pot!

Whole Roasted Chicken

1 Lemon, quartered
1 small onion, quartered
4 cloves garlic
1 (3 to 4-pound) whole roasting chicken, rinsed and patted dry, and giblets removed
1 to 2 teaspoons Olive Oil
1 tsp Salt
1 tsp Black Pepper
1 tsp Parpika
1 tsp dried Thyme

I've never really enjoyed touching raw meat, but sometimes the ends do justify the means. It's always hard to not loose my breakfast when i'm preparing a chicken so I try to eat breakfast after I'm done getting lunch ready. First quarter the lemon and the onion. I had a small chicken so I only used half a lemon and 1/4 of an onion.


This is always a pretty view! Spread those legs wide and stuff the tasty inside! I put in a slice of each and used pre-minced garlic (1 small Clove Garlic - 1/2 to 1 tps mince), then alternated till chicky was full.


Measure out all your spices and put them in a bowl. I've always liked how they look together before mixing; I almost feel like a professional chef! 


Take your Olive Oil and give that chicky a good rub... come on girls, we've all been practicing for this with our daily dose of hydrating moisturizers. Next mix those spices together and generously rub it into the chicken. I tend to do this IN the Crock Pot as to not make a mess on the counter. 


Get that lid tightly on the top and set for 6-8 hours on low. I like to set it for 8, that way it's falling off the bone when I come home from work.

DON'T ADD WATER!!! 
It will magically make its own by the time you get home from work


You can make gravy from the juice at the end by addint 2 Tbls of flour and turn the Crock Pot on High (or transfer to a sauce pan to cook over medium heat). 

Dinner is always good when made in a Crock Pot! It's a life saver for the working wife/mom.